Fact of the Week

Forced rhubarb in season now. Don't miss out!

Saturday 26 February 2011

Sweet peas and Moonwalkers

My greenhouse is at capacity.  It is filled with 130 fledging sweet peas.  My very wonderful friends Paul and Ellie are getting married at the end of May and want their marquee to be filled with sweet peas - not sitting demurely in vases on the tables but tumbling up trellis, intertwined through wigwams and cavorting up the marquee poles - to add a riot of colour and sweet scented nuptial nectar to their very English wedding. 

The one draw-back to their blooming vision is that no-one seems to think it is possible to produce flowering sweet peas in May.  This is a challenge I have embraced, with uncertain expectations as to my chances of success.  My determination has only been strenthened by Paul's account of Christmas lunch, at which three of his grannies were united (possibly for the first time) in agreement that I was unfortunately yet undoubtedly doomed to failure.  Will I be able to confound the combined consenus of these three matriarchs? 

I sowed the seeds in January: 4 varieties (Incense Mixed, Cuthbertson Mixed, Galaxy Mixed and Old Spice Mixed) (with hindsight it might have been better to have limited myself to the early flowering Cuthbertson and Galaxy varieties...), totalling 150 seeds in 30 pots.  They germinated  in 3 weeks (despite the doom-mongers and grannies predictions that they would never germinate in the January cold).  They are now growing strong in my greenhouse.  So far so good.

In due course I will plant them out into pots in which they will stay until the wedding (sweet peas hate having their long roots disturbed).  I will feed them liquid tomato food, move them between the sunniests spots in the garden, whisper sweet pea nothings in their sweet pea shaped ears and generally encourage, cajole, beg and entreat them to flower, abundantly, by 21 May 2011. 

Once upon a time there was a small balcony in Battersea, where I lived with Paul and Ellie.  The balcony bore the beginnings of my gardening entreprise.  In the early days the balcony was home to pots of herbs.  These pots were welcomed by Paul and Ellie, as they provided irrefutably valuable additions to our cooking, Pimms, mohitos and even the odd pot of mint tea.  (They also saved us from needing to purchase packets of herbs from the supermarket at gross expense, thereby appealing to Ellie's accountant's sense of prudent financial management).  As my ambitions grew I expanded the balcony's offerings, though alas not the balcony itself, with the addition of three tomato plants.  As the plants grew (most vigorously and successfully), the available space to sit and enjoy a drink or dinner alfresco diminished and I increasingly came home to find Paul and Ellie cowering under the Jack and the Beanstalk of the tomato world, albeit supping on a delicious tomato salad.  When I moved, not surprisingly, the plants came with me.

With any luck the sweet peas will flower by 21 May and Paul and Ellie will retrospectively consider the early honing of my horticultural skills to have been worth while...

This week's recipe is (one of) Paul's signature cocktails, much sampled on the balcony in Battersea.

Moonwalkers
(Moonwalkers were invented for Neil Armstrong, by Joe Gilmore who was the head barman at the Savoy.  It is legend in Paul's family that Paul's great uncle practically took up residence in the bar at the Savoy and this cocktail has been a family favourite ever since.)
Fresh grapefruit juice
Grand Marnier
Champagne/Cava/Prosecco
Rose water (if you are being faithful to Joe Gilmore's original recipe)

Mix two parts grapefruit juice to one part Grand Marnier in a jug.  Add a dash of rosewater, if desired (too much will ruin it so add with caution).   Pour the mix into champagne flutes, so it fills about one third of the flute.  Top up with Champagne/Cava/Prosecco.

Health warning:  Moonwalkers taste like juice but more than a few glasses and you will not be safe on the balcony...


Saturday 19 February 2011

Rhubarb really recommended

Last Friday I made a mad dash during my lunch break across the City and over London Bridge to Borough Market.  I was in the middle of preparing for a five day court hearing and leaving the office at lunch time was a challenge of immense proportions.  But for the twenty minutes that it took me to step out into the brilliant sunshine and cover the short distance from the office to the market and back, I had but one thing on my mind: rhubarb.

Yorkshire Forced Rhubarb is in season from January until mid-March.  It is grown in the dark in heated sheds over the winter months.  In the cold and dark the rhubarb grows slowly and very upright producing tender, pale pink sticks of sweet delight.  Once ready, the rhubarb is harvested by candlelight so as to expose the plants to minimal light.  The harsh growing conditions leave the plants exhausted and at the end of each season the forced plants are discarded. 

Yorkshire Forced Rhubarb is produced by twelve growers in what is known as 'the rhubarb triangle' in west Yorkshire.  In 2010 Yorkshire Forced Rhubarb was given Protected Designation of Origin status (PDO) by the European Commission (who recognised the exquisite, inimitable flavour of this wonderful British vegetable).  This means that only growers in the designated area can produce and sell 'Yorkshire Forced Rhubarb' (other PDO British products include West Country Cheddar, Stilton and Cornish clotted cream). 


Oldroyd's Yorkshire Forced Rhubarb
 Having successfully sourced 7 kilos of Yorkshire Forced Rhubarb from Turnips at Borough Market (you can also buy it mail order from www.yorkshirerhubarb.co.uk/ruhbarb_triangle.htm) I returned to the office, trying to stem the furious flow of rhubarb recipes which were running, skipping and dancing through my mind (each one competing for a share of my Borough bounty) and drawing me towards the weekend. 

I wanted recipes that would let the rhubarb speak for itself.  Here's what I cooked...

Rhubarb compote
(Rhubarb compote is staggeringly delicious all on its own, or served with a spoonful of natural or greek yoghurt.  It also provides the basis for the rhubarb bellinis and the rhubarb and vanilla cake below - I also  drizzled it indulgently over my rhubarb ice cream - so if you're going to start anywhere, start here!)

1kg rhubarb
Rhubarb Compote
250g caster sugar
1 vanilla pod, split lengthways

Cut the rhubarb into 3cm lengths.  Mix the rhubarb in a bowl with the sugar and vanilla.
Leave to macerate (become soft by soaking, in this case in sugar) for at least 1 hour, or overnight if possible.
Preheat the oven to 170C.
Lightly butter a baking dish, drain the rhubarb (make sure you keep the beautiful pink juice) and pack it into the baking dish.  Cover tightly with foil and bake for twenty minutes.
Remove from the oven and leave to cool before uncovering.

Rhubarb Bellinis
 
Macerating rhubarb


Rhubarb Bellinis
Serve the pink juice with Cava or Prosecco for a fabulous rhubarb bellini.   

Rhubarb and vanilla cake

Rhubarb and Vanilla Cake
115g butter
150g caster sugar
3 free range eggs
175g plain flour
1/4 tsp bicarbonate of soda
125ml low fat natural yoghurt
2tsp vanilla extract
Rhubarb compote

Preheat the oven to 180C
Grease a 1.25 litre cake tin with butter.
Mix the butter and sugar together until they are light and fluffy.
Add the eggs, one at a time, whisking each one into the mixture with a tablespoon of the flour.  Fold in the remaining flour and the bicarbonate of soda using a large metal spoon.  Fold in the yoghurt and the vanilla extract until well combined.
Cover the base of your cake tin with a layer of rhubarb (just take pieces from the compote and leave the juice behind).  Spoon the cake mixture over the rhubarb and spread until level.  Cook for 45 minutes until
the cake is well-risen and golden brown and a skewer comes out clean.
Leave the cake to cool in the tin for 15 minutes.  Run a knife carefully around the edge of the tin.  Turn out onto a large plate (so the rhubarb is on the top - the easiest way to do this is to place a plate on top of the tin and in one bold movement turn the whole lot over).

Rhubarb and orange custard tart
170g plain flour
pinch of salt
30g icing sugar
90g butter
2 tablespoons orange juice, chilled

450g rhubarb
170g sugar
30g flour
1 beaten egg
Grated rind of 1 orange
2 tablespoons orange juice made up to 1/4 pint with water
Sift the flour, salt and icing sugar into a bowl.  Rub in the butter until the mixture resembles fine breadcrumbs.  Add enough orange juice to just bring the mixture together.  Wrap the pastry in cling film and chill for 20 minutes.  Butter an 8 inch pie/flan dish.  Roll out the pastry and line the dish.  Return the dish to the fridge.

Preheat th oven to 220C.  Cut the rhubarb into 2cm lengths.  Mix the sugar, flour, egg and orange rind.  Place the orange juice and water mixture in a pan and bring to the boil.  Pour the juice onto the flour mixture and stir to combine.  Return the mixture to the pan and heat gently, stirring continuously, until it reaches a custard consistency.

Fill the pastry case with the rhubarb pieces and pour over the custard filling.  Bake for 35 - 40 minutes.

Rhubarb ice cream
600g rhubarb, cut into 2cm lengths
150g caster sugar
125ml single cream
125ml double cream

Heat the rhubarb gently in a pan until the juices start to run (stirring occasionally to make sure it does not burn).
Add the sugar and cook over a gentle heat until the rhubarb forms a soft pulp.  Pass the pulp through a sieve and collect the puree underneath.  Leave the puree to cool. 
Whisk the creams together until they form soft peaks.  Fold in 1 pint of the rhubarb puree. 
Pour into a tupperware and freeze as quickly as possible.  When partially set, whisk with a fork and re-freeze (for best results, whisk regularly whilst the ice cream is freezing.  I recommend setting an alarm and whisking every twenty minutes for the first couple of hours.  It's a labour of love but I promise it will be worth it).

Rhubarb ice cream

 
Rhubarb ice cream and compote


This is all I had time for last weekend (rhubarb freezes well so if you have any leftover, cut it into pieces and freeze it for a treat later in the year).  There are so many wonderful ways with rhubarb.  I am desperate to share my Rhubarb and Orange Meringue pudding with you - a family favourite - but it is a big, bold, brash rhubarb recipe and therefore probably best saved for forced rhubarb's summer cousin.
                                      
My rhubarb is growing well, new leaves are gradually unfurling from its crown, but it cannot be forced and I must therefore be patient....x

Friday 11 February 2011

Marmalade myths

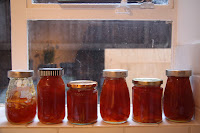
Making marmalade is one of the all important dates in the kitchen calendar.  Seville oranges are in season for a mere few weeks towards the end of January and beginning of February.  Homemade marmalade is one of life's great treats:  spread over hotly buttered toast on a working weekday or a lazy Sunday, it cannot help but get the day off to a good start.  And a couple of hours in the kitchen now and you will be rewarded with a supply of delicious, home-made marmalade to keep you going through the next twelve months (not to mention the steamy, citrusy olfactory delight which will fill your kitchen over the next couple of hours). 

Marmalade, like jam, is easy to make but you do need time to do it.  Contrary to what most recipe books suggest, I have never got my marmalade (or any other jam) to setting point in 15 minutes.  Questions of cooking time, setting point and other marmalade myths I have tried to deal with below.  The result is, I hope, a recipe that will uplift your breakfast table and shake off any early morning blues. 


Marmalade
(makes 5 - 8 jars depending on the size of your jars)

1kg Seville oranges
3 lemons
2kg granulated sugar

Scrub the fruit and remove the buttons at the top.  Put the fruit whole into a large saucepan or preserving pan with 2.5 litres of water.  Bring to the boil and then simmer for 2 - 2.5 hours until the skins are tender and can be pierced easily with a fork.

Using a large spoon, remove the oranges and lemons and when they are cool enough to handle cut them into quarters.  Remove the flesh and pith and pass through a sieve.  You should be left with a sieve full of pith and pips and a bowl underneath the sieve full of a thick (and very bitter!) orange puree. 

Put the pith and pips into a jelly/muslin bag (if you don't have one an old stocking will work just as well!) and tie a knot at the top.  Cut up the peel into thick, medium or thin shreds depending on your preference.

Measure the cooking water - you should have about 1.7 litres.  Make it up to this amount with water if you have less, discard some if you have too much. 

Put the orange and lemon shreds, cooking water, sugar and bag of pith and pips into a large saucepan or preserving pan.  (The pan needs to be big enough to bring the marmalade to a roaring boil and keep it there without boiling over - I would use the biggest one you have - you really need a couple of inches of space at the top of the pan - if necessary divide between two pans.)
Bring the marmalade to the boil, stirring until the sugar has completely dissolved.  Bring it up to a roaring boil and let it boil ferociously until setting point is reached.

Setting point
The easiest way to test whether your marmalade (or any jam) will set once cool is to put a small plate in the fridge and test the marmalade by dropping a little onto the cold plate.  Allow it to cool for a minute and then push it gently with your finger.  If the surface of the marmalade crinkles, it has reached setting point. 

You can buy 'jam thermometers' which mark the temperature at which jam/marmalade will, in theory, set.  In my experience these generally under-read and you will need to bring your marmalade to a couple of degrees hotter than the temperature suggested by the thermometer before your marmalade will set.  The simplest and most fail-safe method is to do the crinkle test above.

Recipe books often underestimate the time it takes for marmalade (or jam) to reach setting point.  They often optimistically suggest a boiling time of 10-15 minutes.  This is one of the great kitchen myths (spread by people who presumably think it's amusing that you might start making marmalade at 9pm on a Sunday evening because that's all the time you've left yourself after a busy weekend and it's only going to take 15 minutes to cook...)   I have never got any jam or marmalade to setting point in 15 minutes.  Once your marmalade has reached a roaring boil, it is likely to take approximately 45 minutes to reach setting point (and longer if you've made a double quantity).  Don't be tempted to give up before setting point is reached (in an entirely understandable fit of doubt that it's ever going to get there) as no-one wants orange syrup on their toast (despite what your guests may say as orange syrup dribbles menacingly down their hand towards their elbow...).  Persevere, it just takes (a lot) longer than the books suggest.

Once setting point is reached, turn off the heat and let the marmalade cool for 10 minutes (this allows the fruit to settle so it will be distributed evenly between your jars).  Then pour into warm, sterilised jars (the easiest way to do this is to heat the jars gently in a low oven) and seal immediately. 

Other options: you can use almost any citrus fruits to make marmalade.  The above is my basic recipe but try any variations and combinations of fruit.  I have also made the above recipe this year with 2 pink grapefruit, 2 lemons and the remaining weight in oranges for a wonderfully tangy, refreshing marmalade.

Sunday 6 February 2011

Eulogy to a pumpkin

With the first whisper of Spring in the air, I spent this morning planning and scheming as to what I am going to grow in the garden this year, choosing what to sow and what not to grow.  It is a delicious job which involves poring over last year's successes and attributing last year's failures to the wrong soil conditions or the unreasonable demands of the plant in question (for example, cucumbers are by nature contrary, at just the point when you think you have provided them with the ideal growing conditions, having nurtured them lovingly through their tender early weeks, they fade and wilt without excuse, apparently lacking neither water, nutrients or warmth...).

It is the beginning of a new edible garden adventure.  I do not grow anything which I can cheapily and easily buy.  This rules out potates, carrots, leeks, onions and cabbage.  Whilst homegrown potatoes are delicious, retaining a hearty, earthy flavour which it is impossible to buy in the shops, there is simply not enough space in my small garden to accommodate them.  I have also struck off broad beans, pumpkin/squash and cucumbers from last year's line up.  Broad beans are delicious and certainly quite difficult to buy (fresh) in the shops.  But they take up lots of space for a relatively low yield and frozen broad beans come a close second to those picked from one's own vegetable patch.  They also attract blackfly by the dozen and I spent too many evenings last summer after a long day at work picking off the swarms of blackfly which had colonised my poor beans.

Pumpkins have been ruled out because they are simply not practical in a small garden.  I planted two last year and with little or no encouragement they set off across the garden at an alarming rate, destroying everything in their wake.  Whilst they did produce pumpkins, the damage done to everything else does not warrant them a role in this year's production.  And cucumbers, enough said.

So that leaves peas (don't think that like broad beans the frozen ones will suffice, homegrown peas are an entirely superior and altogether otherworldly experience to anything you can buy in the shops), tomatoes, courgettes, french beans, chard, rocket, lettuce, aubergines, beetroot, rhubarb, strawberries, raspberries, blackcurrants and gooseberries. 

Some of these can be sown now for an early summer crop so choose what you want to grow, order your seeds (they will all be available at garden centres although on-line suppliers such as Edwin Tucker, Original Touch and Suffolk Herbs are likely to have more exciting varieties and be cheaper).  At just over a pound for each little packet of promise, the collation of this year's seeds signals the start of your 2011 garden adventure:  these seeds will furnish your table, grace your garden with flowers before fruit, provide an excuse to dig, water, stake and support and enable you to forget the cares and concerns of the week amidst the ever changing, ever growing call of your garden.  

I've drawn up my list, placed my orders and am waiting for the little packages to drop through my letterbox.  Whilst I wait, here is this week's recipe.  Last year's pumpkin's vigorous growth has been the cause of its demise, however it did produce beautiful mottled orange fruit which have been adorning my kitchen since their harvest in September.  Tonight the last one is going to be the star of my pumpkin gnocchi.  Enjoy x


The last pumpkin
Pumpkin Gnocchi
1 small onion, finely chopped
Half litre vegetable stock
1 small pumkin or an equivalent size seqment (about the size of a red cabbage), peeled and chopped into chunks
2cm parmesan, finely grated
2 tbsp olive oil
salt and pepper
250g gnocchi
Leftover cavolo nero pesto

Fry the onion in the olive oil until soft but not brown.  Add the stock and, when boiling, the pumpkin and cook until soft, about 10 - 15 minutes.  Liquidise.  Gently simmer until it's the consistency of a thick pasta sauce.  Add the grated parmesan and season to taste.

Cook the gnocchi in salted boiling water.  Drain and add to the sauce.  Serve in bowls and add a teaspoon of any leftover cavolo nero pesto to each bowl.

Other options:  For a really tasty soup, use 3/4 litre stock.  Once liquidised, simply season with salt and pepper and serve with crusty bread.